Jira Integration: Localize Faster by Automating Your Task Management
- Integrating Jira in your Transifex Workflow With Zapier
- Prerequisites
- Step #1: File Preparation in the Transifex Editor
- Step #2: Setting up the Transifex Trigger in Zapier
- Step #3: Creating the Jira Action in Zapier
- Step #4: Run Your Automation
- Bonus Step: Automatically Close Jira Issue When Translation is 100% Complete
We’re very excited to announce that Transifex now integrates with Jira, one of the most popular tools agile teams use!
Jira is primarily used as a task management tool that allows you to track your workflow and collaborate with others. Favored among Agile teams, it provides scrum and kanban boards right out of the box.
No more tedious tasks, switching between Transifex and Jira, no more manual updating and double work; Transifex’s Jira integration is here to save you hours of your time on all your localization projects.
Moreover, by harnessing the automation power of Zapier, you can further branch out your automation to thousands of possibilities, like getting slack notifications, emailing a specific team, status updates, and even sending webhooks.
Read on to learn how you can automatically create, update and delete Jira tasks related to your localization content directly from your Transifex Editor.
Alternatively, you can follow along step-by-step in this short video and create your first zap.
Integrating Jira in your Transifex Workflow With Zapier
Prerequisites
- A Zapier account
- An Atlassian Jira account
- A Transifex account
In this tutorial, we will set up a Zap that will automate the creation of a task in your Jira board with the click of a button. The Jira ticket will contain the unique identifying tag of the source strings, the URL your team will click on to be redirected to the Transifex Editor and will be assigned to a predefined team member.
Stick around for a bonus step at the end for a multi-step Zap which includes sending a Slack notification to a channel that notifies all your collaborators about the newly created Jira issue.
Step #1: File Preparation in the Transifex Editor
For this demo, we’re going to use a simple HTML file as the source for our translations. Feel free to download it from here.
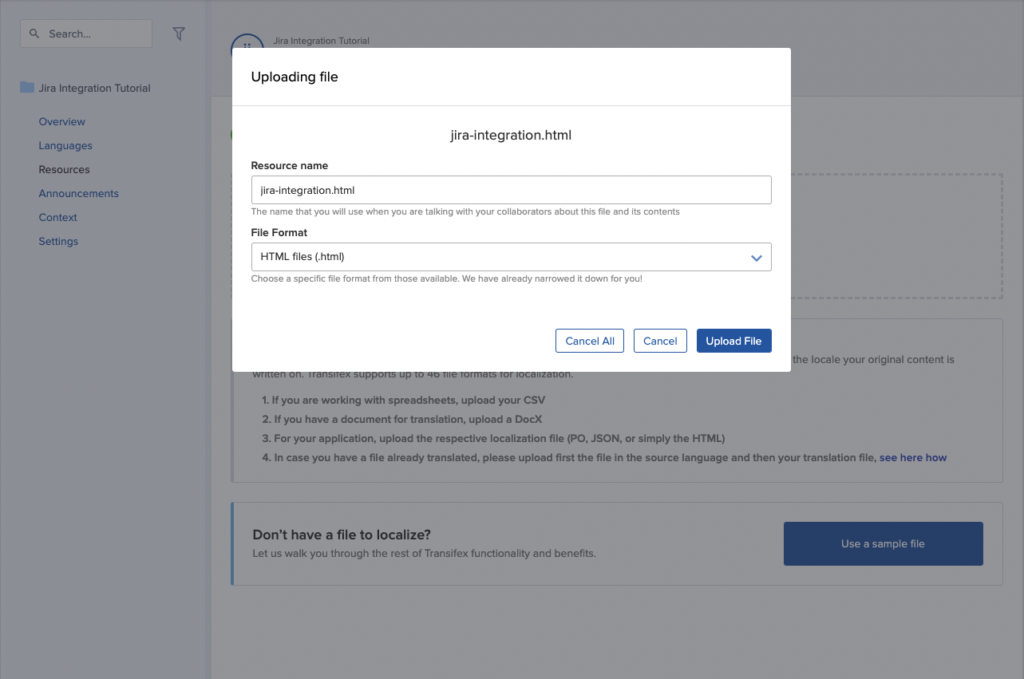
First, let’s create a project and choose French (France) as the target language, and upload the HTML file:
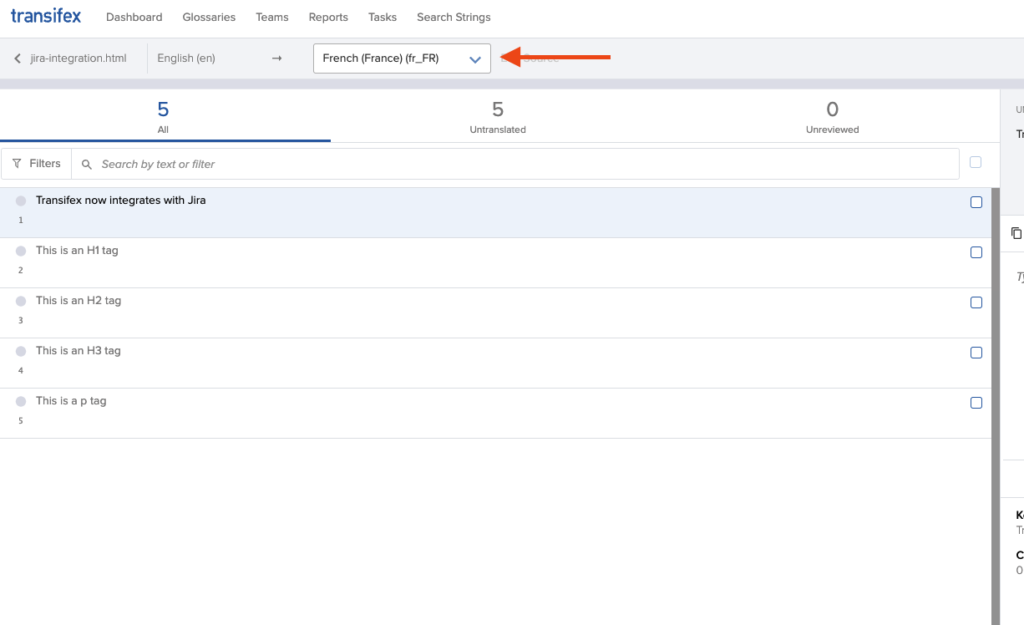
Once you successfully uploaded your HTML file, click on Translate and select the language you would like to create an automation for, in our case French (France)(fr_FR). You will now see the strings in the Transifex Editor:
We have now prepped the file for localization, and we can start creating our zap over on Zapier.
Step #2: Setting up the Transifex Trigger in Zapier
If you haven’t done so already, you can create an account on Zapier, which is free forever. For the first part of this demo, you do not need a paid Zapier account.
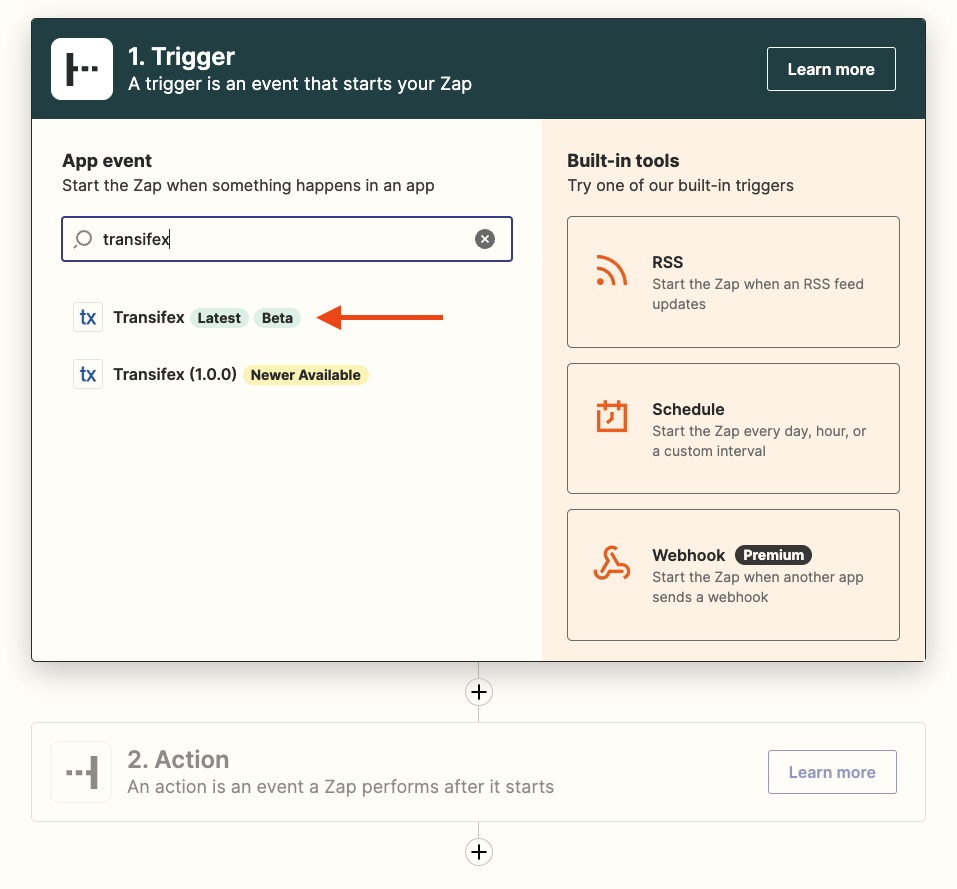
Once created, head on over to your zap editor by clicking on Create Zap and choose the latest release of Transifex as a trigger:
You will then need to connect your Transifex account to Zapier by generating a Transifex API token from your User Settings page and entering it in the Zapier window. Please make sure you save your API key somewhere secure, as we’ll permanently hide it after you close the window. You can always regenerate a new one at any time.
We can now start creating the trigger for our zap.
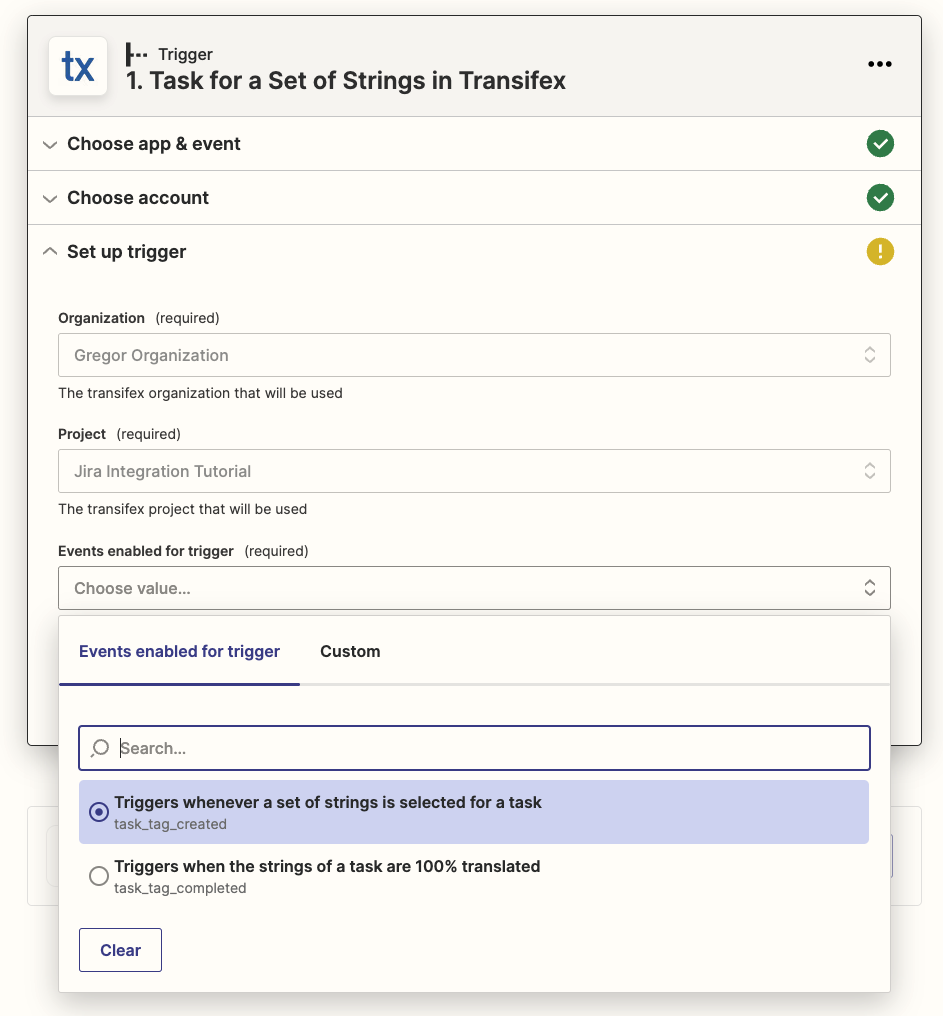
Find your organization and the desired project from the dropdown options, and choose “Task for a Set of Strings” as an event. Then, choose “Triggers whenever a set of strings is selected for a task” as an event trigger. Test the trigger and click Continue.
Test your trigger then click on continue.
Step #3: Creating the Jira Action in Zapier
We will now create the action that will occur when you run the automation in your Transifex Editor. In the next Action step in Zapier, search for Jira Software Cloud.
Choose “Create an Issue” as an Event and connect your account.
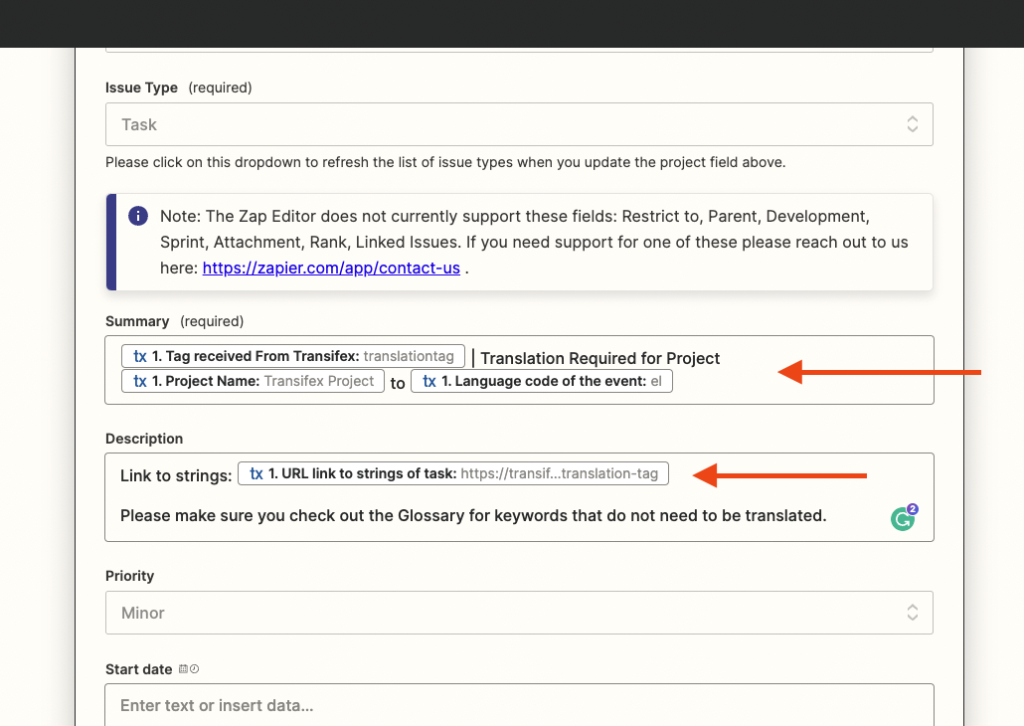
We will now input the “Tag received from Transifex” in the Summary of the task and the Reporter (both required), followed by whatever custom text and variables we might want to send.
We recommend adding the “URL link to strings of task” variable in the Description of the task to make it easier to find the corresponding strings:
Test, publish and turn on the Zap by following the subsequent steps.
Step #4: Run Your Automation
To start using your newly created automation, go back to your Transifex Editor and choose the strings you would like to create a task for, and click on “Create task” under Bulk actions.
If successful, you will get a notification with the specific tag allocated to this group of strings:
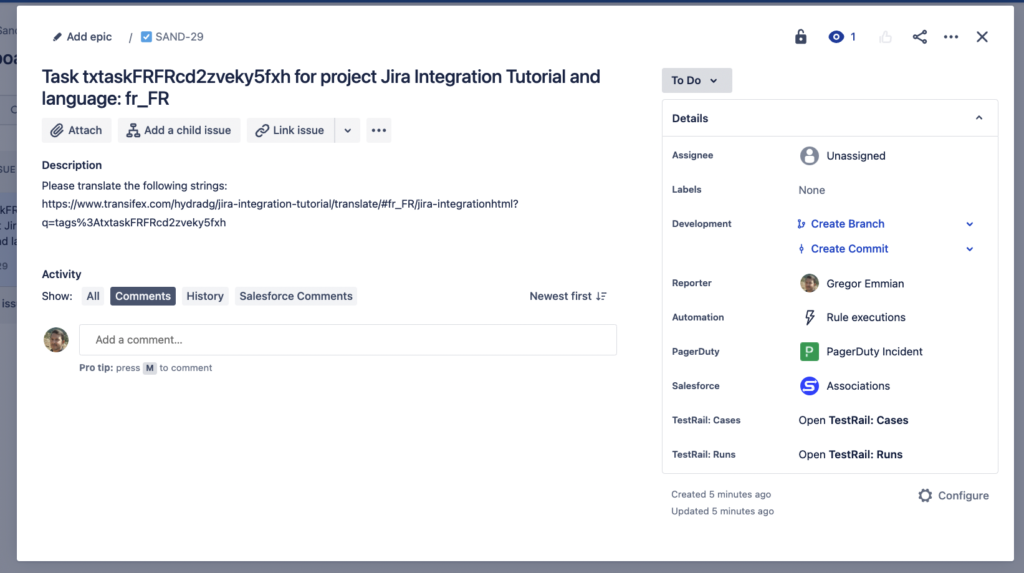
You will now see an automatically created task in the connected Jira project.
After assigning this task to the translator, they will be able to redirect to the Transifex Editor just by clicking on the link inside the Jira task. Only the relevant strings to be translated will be shown to them.
Bonus Step: Automatically Close Jira Issue When Translation is 100% Complete
This bonus step will require having a paid Zapier account. As of the time of writing, Zapier’s free plan allows you to set up single-step Zaps only, meaning 1 Trigger + 1 Action.
In order to automate the closing of a Jira issue when the related group of strings is fully translated, we would need to set up:
- 1 trigger: triggered when the set of strings is 100% translated
- 2 actions: One to FIND the corresponding issue in your Jira board, and another to mark the task as DONE.
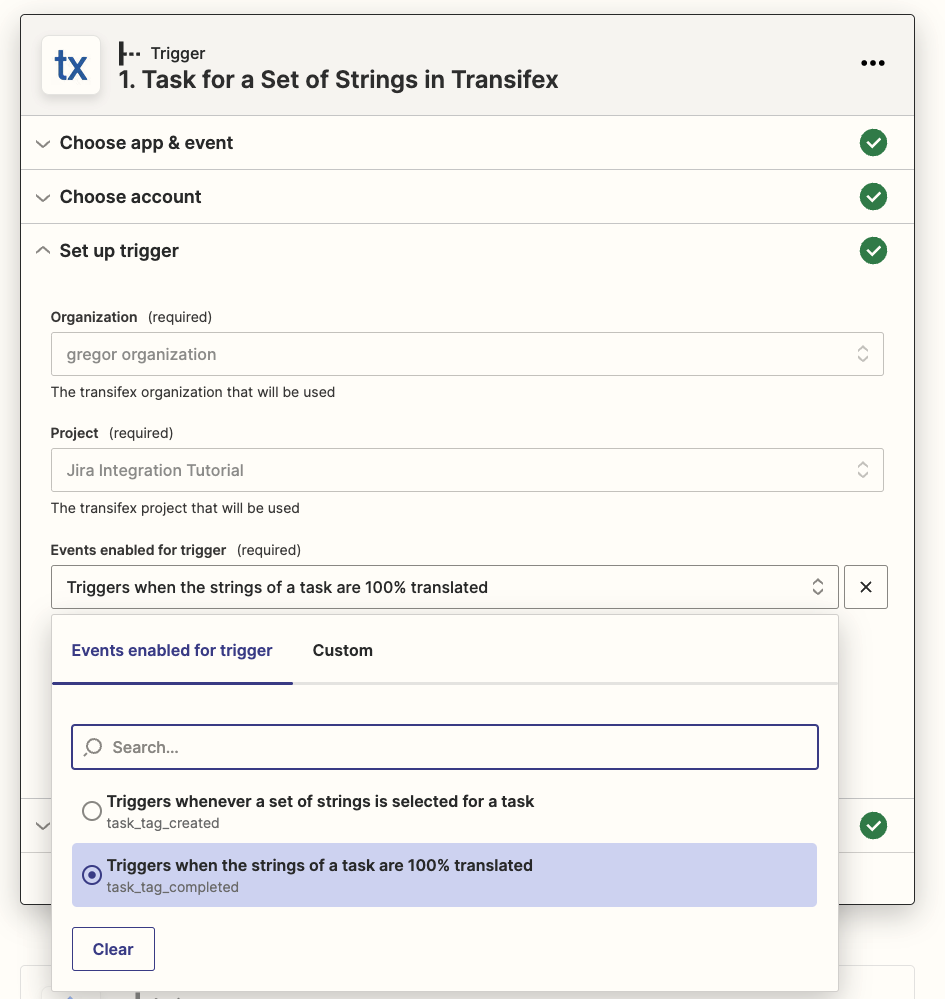
As per Step #2, create a new Zap and set up a Transifex trigger. Only this time, under the events enabled for this trigger, choose “Triggers when the strings of a task are 100% translated“.
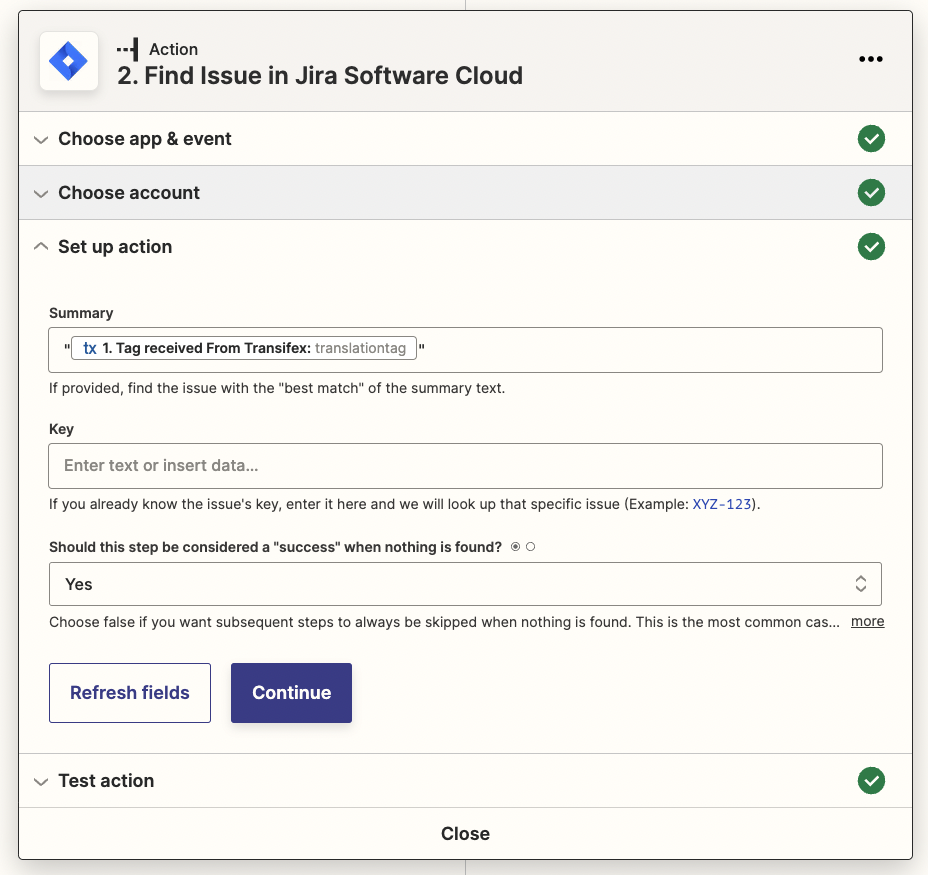
Next, in the next Action step, find Jira Software Cloud, click on “Find Issue” as an event, and input the Tag received from Transifex in the Summary field. For better results, it’s required to have the tag enclosed in double quotation marks.
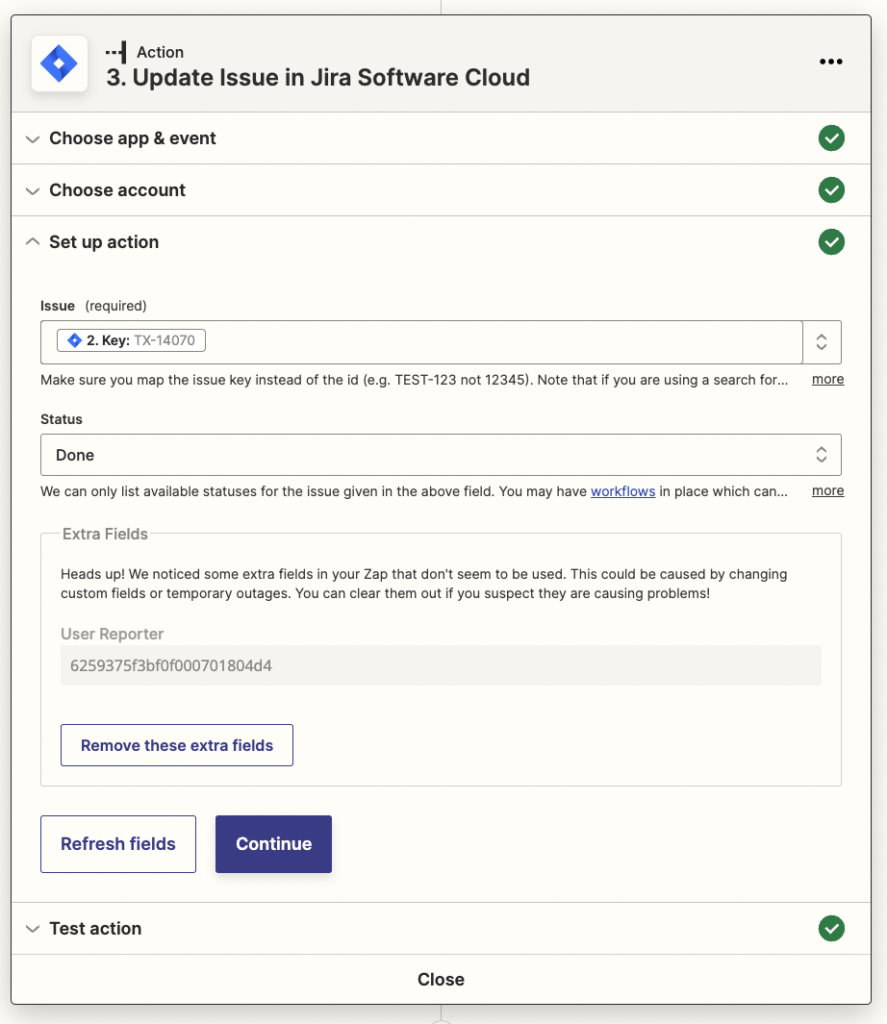
Lastly, create a third Jira action, choosing “Update Issue” as an event.
Fill out the Issue field with the “Key” pulled from the second step and the Status that you would like to move the task to. In this case, marking the status as DONE:
That’s it! Your Jira tasks will be automatically closed/moved to Done once all strings from that specific task have been translated.
If you run a multi-lingual project, the Transifex Jira integration is a no-brainer. You can use it to automate the creation, and updates of tasks, saving you or your team many man-hours in the process.
The setup process is thankfully straightforward, with Transifex’s support team available for advice. It’s perfect for small and large organizations alike, and it’s stress-free once you get it installed.
You can also read more about the integration here or head over to the Transifex + Jira documentation.
Related posts
Sketch Plugin: Start Localization at the Design Stage
Transifex Zapier Integration: Now Publicly Available With Templates
Transifex now Supports PPTX and Google Slides Via Zapier


