The ultimate guide to app localization
- What is app localization?
- What is mobile app localization?
- App localization strategy
- Don’t sleep on internationalization
- Set the technical foundations
- Identify and prioritize your target audience
- Go beyond translation
- Measure your results
- Examples of app localization
- Why app localization is important
- Challenges of app localization
- How to perform app localization
- Android app localization
- iOS app localization
- JavaScript localization
- Django localization
- PHP localization
- Angular localization
- React localization
- Wrapping Up
These days, localization comes in multiple forms and needs. Website localization, video game localization, or, in this case, app localization.
But what is app localization, exactly? Why should we bother with it? What are its challenges? And how can we deal with them as efficiently as possible? Here is all you need to know!
What is app localization?
App localization is the process of taking your app and making it more appealing for a specific locale. And with “app” you can think of anything like a web app, PC app, and mobile app.
Do keep in mind that localization and translation are not the same thing. Translation is a part of localization, but localization itself may require you to further modify text, images, etc.
Needless to say that ideally, you also want to localize your app across all of the operating systems that it’s available in, such as Windows, Android, iOS, Mac, Linux, etc. Any OS or platform that is not dealt with is missed potential revenue.
What is mobile app localization?
Mobile app localization refers strictly to the mobile variants of applications.
There are quite a few mobile operating systems out there. However, pretty much everyone only localizes in either of these two, or both:
- Android
- iOS
The reason being that these are the most popular platforms.
App localization strategy
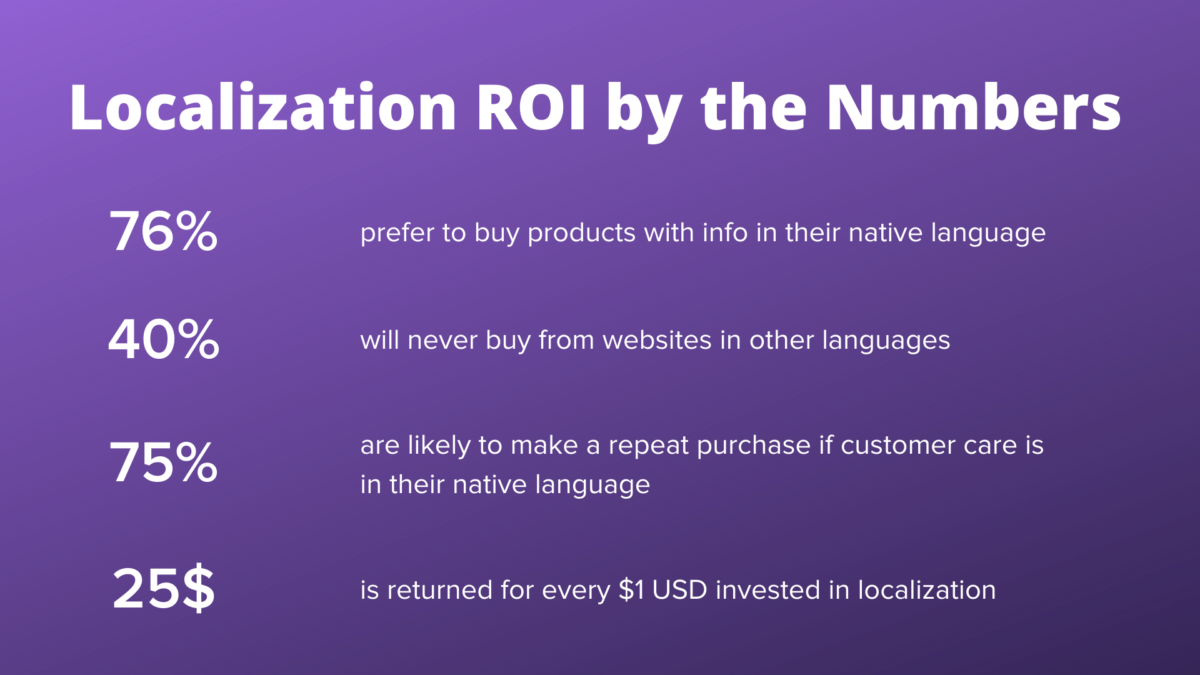
A study by the Common Sense Advisory found that 75% of consumers are more likely to buy a product if the information about it is available in their native language, and another study by the same company found that 55% of consumers are less likely to make a purchase from a website that is not localized for their language and culture.
App localization is a form of investment. And just like with all investments, you don’t want to just blindly pour money in and hope for the best. You want to move with what is going to yield the best results for both your customers/audience and your business.
Here are a few key steps to take before you start localizing your app.
Don’t sleep on internationalization
Have you ever used an app where the UI and text breaks as soon as you swap to your language? This is a result of bad internationalization or lack of localization testing.
Before localizing your app, engineers need to keep in mind matters such as:
- Date formats
- Support for international characters
- Different forms of currency
- How each region affects the UI
- Right to left languages
And possibly more, depending on the markets you are targeting and your app.
So, internationalize your app and test your localization efforts to make sure everything is going to work as flawlessly as possible on launch.
Set the technical foundations
Setting the right technical foundations for localization will help your whole team localize with higher quality, more efficiency, and even with lower expenses.
You can start by getting a Translation Management System as your localization outpost to:
- Sync all of your content with the app & the platform
- Give the localization team a common place where they can work and communicate
- Use built-in app localization tools to automate and speed up the localization process while improving translation quality
- Connect your localization workflow with your favorite software (Figma, GitHub, Python, Jira, WordPress, etc)
Identify and prioritize your target audience
There are more than 7,100 languages in the world. Not to mention all the different cultures depending on the locale.
Reaching all of these people would be impossible, as well as a horrible ROI (Return On Investment).
So, start by localizing for audiences that are already interested in your app, and follow with the most promising markets, depending on trends and what your competitors are doing.
Go beyond translation
We all know that machine translation can not compete with a translator in terms of quality. But have you ever wondered why?
The reason is machine translation can not take matters such as context and culture into account – things that are important for your translation quality.
And that’s why it is your job to go beyond translation and think about matters such as culture. Think of something like colors.
Red is considered a negative color in most of Europe and the US. For the red color in China, however, the exact opposite applies. So you may want to take that into consideration when designing your app icons.
Measure your results
“If you can’t measure it, you can’t improve it.” – Peter Drucker
Any business where you have to interact with humans is a business where constant testing is needed. Otherwise, how would you know how thousands, or maybe even millions of people, feel about your content?
Here are some metrics to set in place to measure your app localization effectiveness:
- New customers per targeted market
- Conversion rate for localized VS non-localized section (You can do A/B tests with branching)
- Bounce rate on localized & non-localized versions of the app
- ARR growth before & after localization
- Customer retention rate before & after localization for target locale
And possibly more, depending on your team and localization efforts.
Examples of app localization
Localizing an app often includes in-app content, a user interface, and, in some cases, even video subtitles as well. Netflix is a good example of that.
Netflix not only localizes their UI, but even their content titles, subtitles, descriptions, documentation, and pretty much everything that you can think of. Of course, there are some cases where leaving the default title in its native tongue works for the best.
Then you also have some rare exceptions such as Google, where they are not just localizing one app, but basically a whole operating system!
And if you have an Android smartphone, you can try that out yourself. Changing the language on your phone makes every single Google app switch to that selected language! Just make sure not to pick a foreign language or switching back to one you know is going to be a considerable challenge.
Why app localization is important
First and foremost, profit. A CSA research shows that on average, localizing your product has an ROI of $25 for every $1 spent on localization. You basically make 25 times as much as what you are spending.
But it’s not all about direct profit. Localizing an app also helps you:
- Get better SEO rankings in various regions
- Position your company as an international brand
- Gain the competitive advantage
- Reach out to more people
- Help these potential customers understand your product and/or services better
So, there is no doubt that localization should be a part of your business strategy. The only question is “how”.
Challenges of app localization
Localizing an app is not a simple task. As mentioned above, it’s not just about translating content from one language to another.
In the case of apps, you also have to deal with things such as:
- User Interface
- Text
- Images
- Videos
- Animations
- Currency
- Time and date formats
- Legal documentation
Not to mention anything about all the work that needs to be done from the engineers’ side regarding internationalization and code changes to handle new strings and updates, in general.
Of course, not all apps require handling all of that. But no matter the degree, the core challenge of having to manage all the different parts of your app along with the whole localization and engineering team, is still there.
Another big challenge with app localization is continuous localization. As your app keeps on receiving updates and new features, these must also be implemented to the translated/localized versions of the app. And that’s a rough thing to do if you are still working with spreadsheets.
How do we deal with that?
How to perform app localization
App localization is a mountain that you can climb in tons of different ways, depending on your team and what works best for you.
But, at the end of the day, the best solution is to use a Translation Management System (TMS) like Transifex to host your content, manage your team, integrate your other software with it, and push translations.
The biggest challenge is arguably to get started with the setup. You have to pick a way to sync your app’s content with the TMS. And to do this, you get to choose between one or multiple of these options:
- Extract your app’s content and upload it to the TMS in the form of a localization-friendly file format, then download the translations and push them live with some help from engineering
- “Install” the TMS directly to your app so they can seamlessly stay in sync over-the-air
- Integrate the software where you host your content with the TMS (GitHub, Bitbucket, etc)
For this brief guide, unless otherwise specified, we are going to be relying on the second option: installing the TMS to your app and pushing/pulling content over-the-air. And you can either make a pull/push command when ready, or allow for automatic cache invalidation, which will automatically sync any changes from the TMS to your app.
This allows you to get rid of the whole process that comes with extracting your content.
If the language/framework you are using does not support this, don’t worry. You can always revert to the first method for pretty much anything out there.
Here is how you can localize your app!
Android app localization
Android Studio is usually the go-to choice for Android localization. The way it works is that you place your strings in a resource file, translate them, and move them back to the project.
But as your app gets bigger and you add more languages, this task becomes increasingly more complex. That’s why we opt for an alternative called Transifex Native.
The reason being that with this alternative, you get over-the-air translation delivery, among other features. Thus, significantly reducing complexity in the long run.
For example, parsing your source strings from your project to Transifex is as simple as executing this command in the root directory:
java -jar /path/to/transifex.jar push -t <transifex_token> -s <transifex_secret> -m <app_module_name>
And the same goes for pulling:
java -jar /path/to/transifex.jar pull -t <transifex_token> -m <app_module_name> -l <locale>
This localization tool features automatic cache invalidation, which means you don’t necessarily have to manually make these requests.
For more information, check out our Android localization guide, YouTube installation tutorial, or documentation.
iOS app localization
If you’ve tried localizing your iOS app you probably already know that Apple offers an integrated experience within Xcode. And you probably also know about the issues that can emerge when you translate, update, and maintain your localized app throughout the lifetime of your product.
Not to mention that issuing an update just to amend some translations can be a lengthy process.
To fix this, install the Transifex Native SDK to your ios app’s Xcode project to update the translation cache on the next application launch, eliminating the need for updating to amend translations. And you are simultaneously getting rid of messy file management issues as you start relying on over-the-air push & pull requests.
This is how a push command looks like:
txios-cli push --token <your_transifex_token> --secret <your_transifex_secret> --project <Awesome.xcodeproj>
And this is the pull command:
txios-cli pull --token <your_transifex_token> --translated-locales <comma_separated_list_of_locale_codes> --output <output_directory>But keep in mind that you have automatic cache invalidation. So you don’t actually have to manually make these push & pull requests.
More about this on our iOS localization guide, YouTube tutorial, and documentation.
JavaScript localization
There are many ways to localize a JavaScript app. You could extract the content in the form of a JSON file and upload it to a TMS, grab an internationalization library, create your own solution, and more.
But how about integrating it with the TMS so that you’ll never have to bother with file extraction and deployments again? You can use Transifex’s CDN to push and pull content OTA and the CLI for any commands you may need to execute.
You can add the CDN to your HTML file as easy as this:
```HTML

<!DOCTYPE html>

<html lang="en">

    <head>

        <title>JavaScript Transifex Demo</title>

    </head>

    <body>

        // ...

        <script

            type="text/javascript"

            src="https://cdn.jsdelivr.net/npm/@transifex/native/dist/browser.native.min.js"

        ></script>

        <script src="./index.js"></script>

    </body>

</html>
And then you can configure the transfer using a token that you’ll get after signing up:
```js

const tx = Transifex.tx;

const t = Transifex.t;

tx.init({

    token: 'ADD TOKEN KEY HERE.'

});

```
Refer to this article for the full JavaScript localization guide.
Django localization
Are you building a web application with Django and looking to expand its reach to a global audience? Although Django has built-in localization support, it comes with limitations, such as locale restrictions. Using the Transifex SDK, you can streamline your Django localization efforts by leveraging its advanced features and integrations including over-the-air translation delivery and intelligent string management.
PHP localization
When it comes to PHP, PHP arrays usually get the job done for translation and localization. But that is as long as your translators are fine working within the code and in case you don’t have ambitious growth plans.
For everyone else, extracting your content in a PHP file format and uploading it to a Translation Management System is preferable.
More about this in our PHP localization guide.
If you have a PHP website, on the other hand, and you don’t want engineers to be involved at all, you can use a live editor. All you have to do is install a snippet to your code or install a WordPress plugin, if you are on WordPress.
More about this method in this website localization guide.
Angular localization
You can localize an Angular app with various libraries. There is the built-in Angular i18n module, ngx-translate, or i18next.
But the one downside they all have in common is that they require you to work with files.
If you want to seamlessly sync translation changes from a localization platform and your angular app without having to worry about files, you can link your app to the Transifex content delivery system (CDS).
npm install @transifex/native @transifex/angular @transifex/cli --save
More about it in this angular localization guide.
React localization
As with many other app localization solutions, React localization is often done by using the custom JSON approach that holds your strings, or the React-i18next framework.
But both methods bound you to files, which introduces management and custom automation challenges on your side.
If you want to get rid of that and enable automatic OTA push & pull requests, you’ll have to install something called Transifex Native to your code. You can install the extension library as easy as:
npm install @transifex/native @transifex/react @transifex/cli --save
You’ll also need the additional React components library as well as a Transifex account to link your app with the content delivery system.
More about React localization here.
Wrapping Up
That’s all you need to know about the basics of app localization. If you want to learn more about it and how Transifex can make localization easier, feel free to reach out to us for a free trial or a demo!
Related posts
JavaScript Localization: A Step by Step Guide
The Conclusive Guide to Django Localization
React Localization With Transifex Native: All you Need to Know
