PHP Localization: The Ultimate Guide
PHP is a stable and well-acknowledged programming language in the world of software development. Despite a lot of competition from other backend programming languages such as Node.js, Python, Ruby, and many others, a lot of applications that are currently deployed or still in development are built with flat PHP without the use of frameworks, which is in part what makes PHP localization popular.
Due to the popularity of the PHP language, learning and knowing about localization techniques in PHP is a very important process every developer or development team must consider and adopt.
That is why in this article, we’ll be learning about the different ways that we can use to approach PHP localization.
What is Localization?
Localization (L10n) is the process of adapting content to suit specific locations so that the target audience in that location can understand the said content. Put in very simple terms, localization means to design software in such a way that it can handle multiple locations, languages, and regions.
It is important to also note that localization doesn’t just dwell on languages. It can also be used to address other forms of media such as images, number formats, date formats, currencies, etc.
And when it comes to PHP localization, there are a few different approaches that you ca n use.
Selecting the right tools, frameworks, approaches, or libraries can admittedly be a bit confusing.
In this step-by-step guide, you’ll learn all you need to know about PHP localization.
Different Ways to Localize a PHP Project
In this section, we’ll move on to discover how we can implement localization for a PHP project by showcasing the following methods:
- PHP Arrays
- Define statement in PHP
- Transifex File-based Approach
PHP Arrays
Localization of PHP projects with the use of arrays is a method that has been in existence for a long time.
For this method to work, you have to create a corresponding array for each language that you’ll be translating your content to, e.g., an array for Spanish, Arabic, Portuguese, or so much more.
These arrays are then used to map the source language or keys to the localized content.
Plain Text Translation with PHP Arrays
We’ll be looking at a particular use case here where we’ll implement localization for four different languages which include: English, Chinese, Arabic, and Spanish. English would be the base language here as it’s the primary language of most applications and systems. A separate PHP file would be used for each array to increase readability. However, the same file can also be used to store all the arrays.
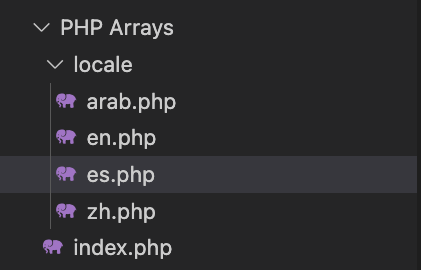
In this example, we’ll be translating the sentence “Welcome to this tutorial” with PHP arrays into all the languages mentioned above. First, create a file structure that looks like the image below:
Note that the arab, en, es, and zh are the locale codes for the Arabic, English, Spanish, and Chinese languages, respectively. In the index.php file, you will create a simple form that includes a dropdown in order to ensure the user can easily select languages.
<form name="langSelect" action="" method="get" >

     <select name="langID" id="langID" >

         <option>Select Language</option>

         <option value="arab">Arabic</option>

         <option value="zh">Chinese</option>

         <option value="en">English</option>

         <option value="es">Spanish</option>

    </select>

    <br/><br/>

    <button type="submit">Submit</button>

</form>
Creating Translation Files
PHP-Array/locale/en.php
<?php

   $langArray = array(

       "welcome" => "Welcome to the tutorial",

   );

?>
PHP-Array/locale/zh.php
<?php

   $langArray = array(

       "welcome" => "欢迎使用本教程",

   );

?>
PHP-Array/locale/arab.php
<?php

   $langArray = array(

       "welcome" => "مرحبًا بكم في البرنامج التعليمي",

   );

?>
PHP-Array/locale/es.php
<?php

   $langArray = array(

       "welcome" => "Bienvenida al tutorial",

   );

?>
Here we have created an array called langArray and mapped the key to the appropriate string in all four of our languages.
Next, we’ll go back to our index.php file in the PHP-Array folder and make it display the “welcome to the tutorial” line. The language of the content should be changed according to the language the user selects from the dropdown. To do this, let’s add the following PHP code snippet to the index.php file.
<?php

       if (!isset($_GET['langID']))

         $lang = 'en';

       else

         $lang = $_GET['langID'];

        include('locale/'. $lang . '.php');

       echo $langArray['welcome'];

?>
Here you can get the selected language’s code and import that particular translation file. Finally, we got the content of the ‘welcome’ key from the imported file.
File-Based Approach to PHP Localization
As the name implies, file-based localization means you’ll have to extract your content in the form of a file and upload it to the Transifex Translation Management System (TMS).
Then you would typically translate the content, download it back from the TMS and upload it back to your app/website and deploy the changes.
In the process of localization and internalization to suit several languages as described above, your approach might be to have code locally localized without the use of libraries, a CDN, or several configuration exercises. This local process is highly feasible as it involves creating local files translated by several individuals into different languages.
For the same example in “Plain Text Translation with PHP Arrays,” Transifex allows the upload of a source file which is the English version of our content for this demo (en.php).
After this initial stage, you can use Transifex to translate your content, after which you can download it and deploy the changes to your website or app.
We’ll look at how to create a file-based project on Transifex and then upload our source content for translation. Transifex would take care of the translation, and we can then download the translated content.
How to Create a File-Based Project on Transifex
The first point of entry into the Transifex universe is by creating an account. You can Sign Up with your GitHub, Google, or LinkedIn account, which is free for 15 days, and free forever for open-source projects.
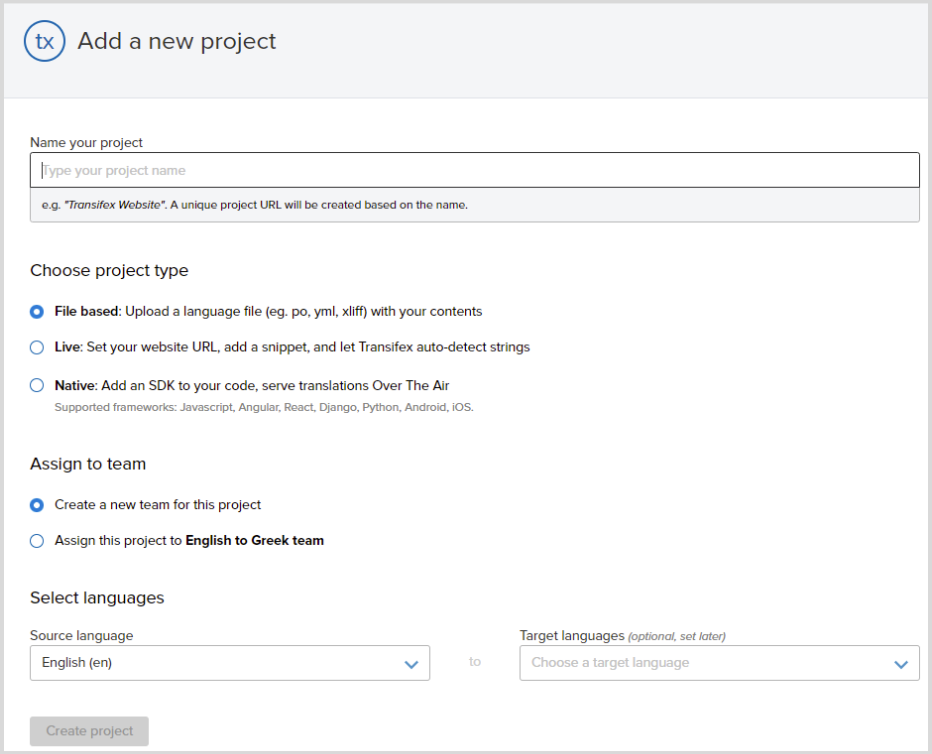
After account creation, you would be required to create a project. Make sure to select “File based” as your project type for this part and then you can name your project as you deem fit.
Finally, you must specify your application’s primary language and the language(s) into which we will translate it. We’ll use English as the primary language for this guide, with Arabic, Spanish, and Chinese as our target languages.
Note: Uncheck the box that asks if you want to add a demo file automatically unless you want to use it to test the Transifex platform first.
When you finish, click on the “Create Project” button.
Following that, we will direct you to the next page, where you can upload your source file in any supported format. but we will use the PHP file format.
After creating your project, select the “Upload file” button to upload your extracted PHP file:
When that is done, you’re all set to start translating your content into the editor!
Downloading Your Translated Content From Transifex
After the above process has been finalized, we can go ahead with downloading the translated file after successful translation into the content of our application.
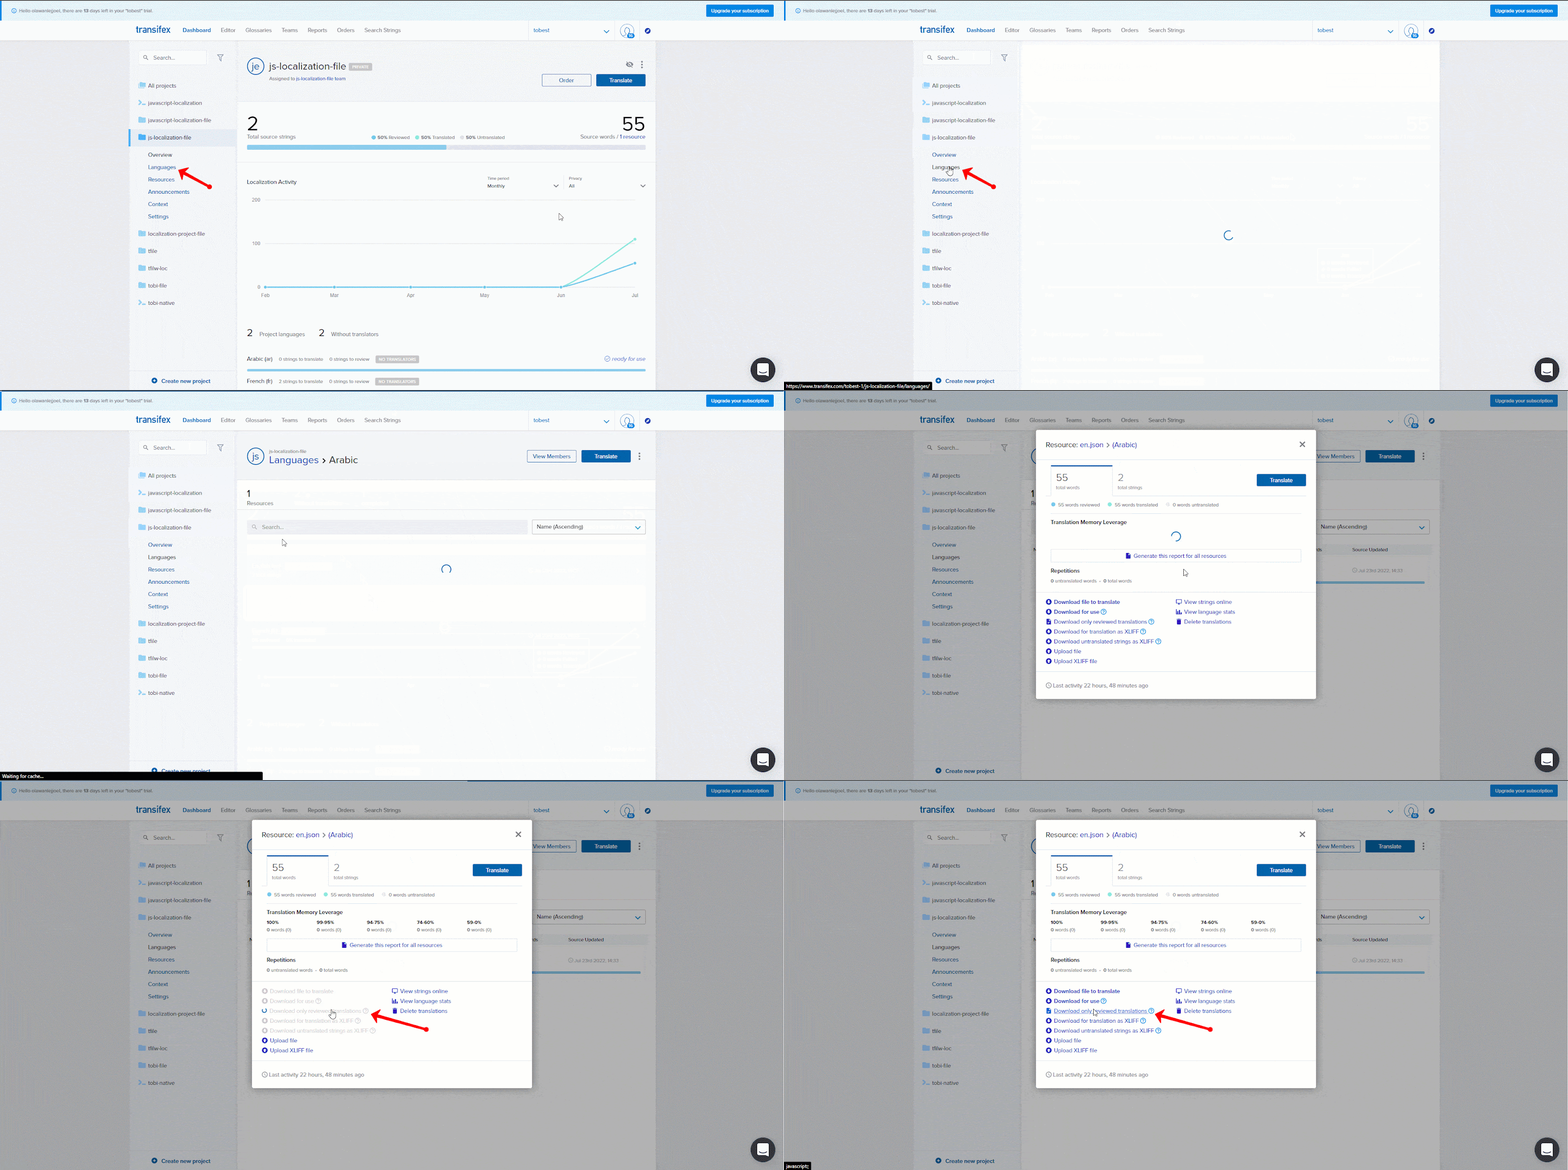
To download the translated file, navigate to your project’s language tab, click on the file, and then select “Download only reviewed translations.” Transifex will allow us to download a PHP file of your translated language:
Note: Please ensure to save the file with the locale name in the `lang` folder we created earlier, e.g., `./lang/ar.php`.
Conclusion
We’ve successfully implemented PHP localization with PHP arrays and also shown you the best way possible to achieve localization by using Transifex’s File-Based approach. The file-based approach works efficiently for both large and small projects.
For more information regarding our supported localization file formats, feel free to check the developers’ documentation!
Related posts
Vue Internationalization: Getting Started With Transifex Native
What is Website Localization & How to Implement it
